In 3 easy steps, this article describes how to ssh into raspberry pi.
SSH (Secure Shell) is a network protocol which allows to securely operate network services over an unsecured network. SSH provides a secure channel and has client-server architecture i.e. one can connect to the SSH server using an SSH client application. By default Raspberry Pi OS (previously called Raspbian) comes with OpenSSH server preinstalled which can handle user authentication, terminal connections, encryption, file transfers, and tunneling, however, to use it we need to enable the service. Here are 3 easy steps to do that:
First of all, do not forget to change the default password of Pi when enabling SSH service, this is required safety measures.
There are a couple of ways to enable ssh service in raspberry pi.
Desktop – If your raspberry pi is running the desktop version of Raspberry Pi OS the most convenient way to enable ssh service is from the menu choose Preferences then Raspberry Pi Configuration then in the opened window click on Interfaces tab which will show following content:
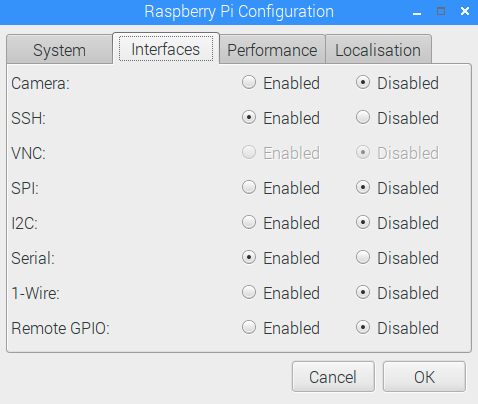
Here we just need to choose the Enabled option in the second row and click on the OK button to save the configuration.
Console – If your raspberry running Raspberry Pi OS without a desktop or you want to enable ssh from a terminal you can run sudo raspi-config command in terminal which will open following configuration tool:
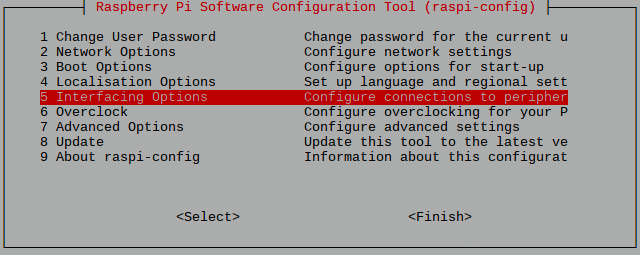
From this menu please select Interfacing Options and hit Enter. As a result, we will see the following options:
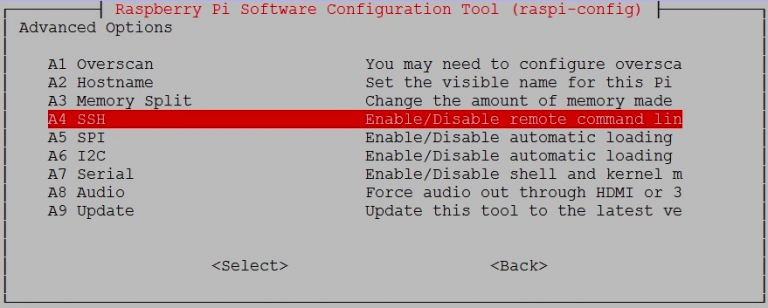
Now we need to navigate to and select the SSH option, then choose Yes, Ok, and Finish.
Console alternative way – In case we are not want to use any specific configuration tool for enabling ssh we can do it via systemctl command (which is a tool to control services). We just need to run these 2 commands in terminal for enabling and starting ssh service: sudo systemctl enable ssh and sudo systemctl start ssh.
Headless – All previous methods require a monitor and keyboard attached to our raspberry pi. What if we don’t have them connected to raspberry? There is still a way to enable ssh service and connect remotely to the device.
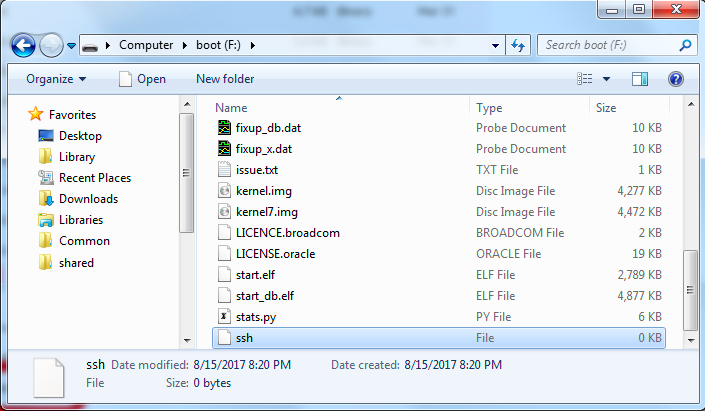
When we flashing a Raspberry Pi OS onto a blank micro SD card, it will create two partitions. The smallest one is labeled as a boot. To enable SSH we just need to create a file in the root of the boot partition called “ssh” (without any extension). The content of the file does not matter, moreover the file will be deleted on the first launch of the device. All these actions can be done on another computer, that is why this method called headlessly and does not require the monitor and keyboard connected to the raspberry pi.
Once we enabled ssh service in raspberry, it is ready to accept ssh connections and we are ready to ssh into raspberry pi from our local network. To connect to raspberry we need to know the IP address or hostname of our device so we will make a proper connection.
By default, our raspberry should have raspberrypi.local hostname, but let’s dig more and find out the IP address of our device.
First of all, if you have a monitor and keyboard connected to your device we can run ifconfig command in terminal and find out the IP address.
Alternatively, if we have access to the router’s configuration page, we can find out the IP address from the router’s connections list.
However, the most reliable way to do this is to use a network scanning tool like Angry IP Scanner, which is an open-source, cross-platform, and very intuitive tool. This method does not require access to the router or raspberry pi directly.

Now we know the IP address of our device and ready to ssh into raspberry pi.
Now we need to choose a proper ssh client depending on which OS we want to ssh into raspberry pi. For macOS and Linux we can use terminal which comes preinstalled on every distribution. We just need to run ssh <username>@<IP address> command to start a remote connection, where the default username of raspberry is pi. So for our specific case, the command would be ssh [email protected]. After running a command it will ask a password and then after the authentication, you can interactively control your device.
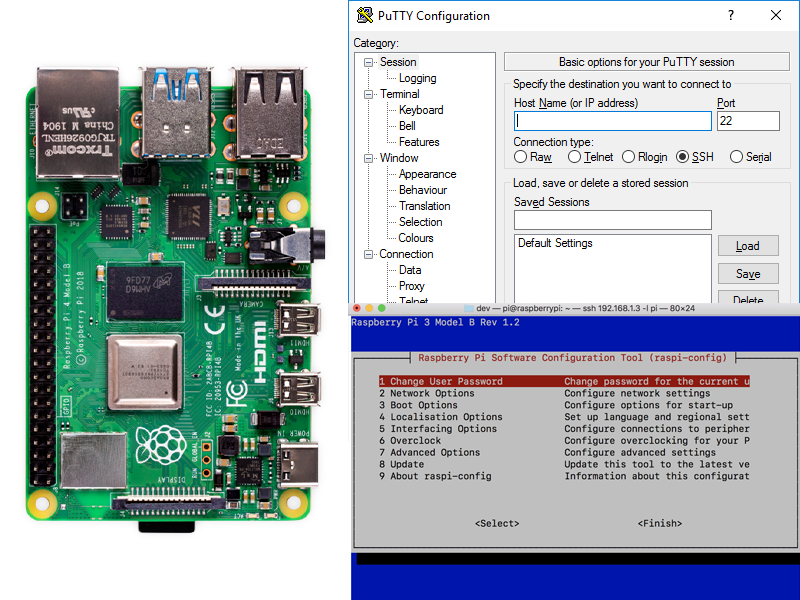
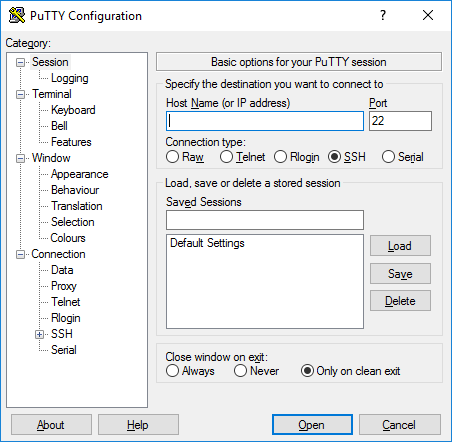
For windows the most convenient ssh client is putty, which is an open-source project and has a very intuitive interface:
Previous two sections covered a question of how to ssh into raspberry pi, so one can ask what is Tunnel In and why we need it?
Tunnel In is a platform that can allow to easily create secure tunnels and extend different services from being used only from the local network to be used everywhere around the globe. In other words, Tunnel In will allow you to ssh into raspberry pi even if you are not in the same network with your device, instead, you can ssh into raspberry pi remotely (from anywhere in the world).
To start using Tunnel In you just need to create an account of Tunnel In, setup the agent of Tunnel In (it supports Windows, Mac and Linux, for raspberry pi you should select Linux Console option) then you can monitor and manage your device remotely in our web platform:
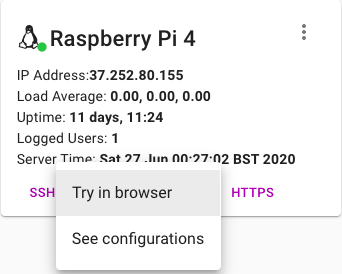
Then you have two options – Try in the browser which allows to ssh into raspberry pi without installing any ssh client and use a browser as an ssh client or See configurations and by using the configurations, which system assigns to your tunnel, connect to the raspberry pi using the ssh client you like most.
Tunnel In can also create https tunnels to securely expose your local running webserver to the world. This may be useful if you are running OctoPrint for managing your 3D printers, Home Assistant, or openHAB for controlling smart home or any other web applications.
Tunnel In also can create proxy tunnels and make you able to use your remote device’s internet as well as VNC tunnels to allow you remotely access to your device’s desktop and many more (theoretically Tunnel In can forward and network services you are running locally on your devices and allow you to consume these services remotely).
By the way, you can play with Tunnel In functionality in our Demo account before registering an account.
This is Tunnel In blog where we are writing about our service capabilities, how-tos, and about similar technologies.
We are using Tunnel In for managing tons of EDGE network servers. It is great to have such a tool and from one console to monitor and manage all our servers.
Relying on Tunnel In's enterprise solutions, we were able to develop our context-aware digital signage platform in a very short amount of time.