Minecraft is one of the most popular video games in the world. It is written in Java programming language and has been released in 2011. Currently, it is ported to various platforms, sold around 200 million copies, and has 126 million active users as of 2020.
In this article, we are going to setup the Minecraft server and discuss the question – “how to allow minecraft through firewall?” by forwarding traffic through a secure tunnel and as a result bypass a firewall or double NAT problems.
We all love to play Minecraft with friends and create crazy worlds together. To achieve this we should have a Minecraft server, but wait should we buy one in the cloud and spend a 100$ per year for this? We definitely have an old laptop or PC which can serve as great hardware for the Minecraft server. First of all, we are going to install the Minecraft server in our hardware, and then we are going to expose our server to our friends?
Setting up a multiplayer Minecraft server is quite an easy task. By following https://www.minecraft.net/en-us/download/server link you can find the latest version of the Minecraft server and download it to your computer. Before starting the server you should have Java installed on your computer. Nowadays Java comes with all operating systems by default, however, for Windows, you may be required to play with the PATH environmental variable – It is required to make sure that you can use java from the command line.
To start Minecraft server you should run the following command:
java -Xmx1024M -Xms1024M -jar server.jar nogui
The first run may seem exits with some warnings and errors:
[12:33:18] [main/ERROR]: Failed to load properties from file: server.properties
[12:33:18] [main/WARN]: Failed to load eula.txt
[12:33:18] [main/INFO]: You need to agree to the EULA in order to run the server. Go to eula.txt for more info.
However, it is ok! It justs created default configuration file for a server called “server.properties”, another file for end-user license agreement called “eula.txt” and informs us about accepting the license. To accept the license we should open “eula.txt” file and replace “eula=false” statement in the last row with “eula=true” then save the file and close.

Now is the time to run following command again:
java -Xmx1024M -Xms1024M -jar server.jar nogui
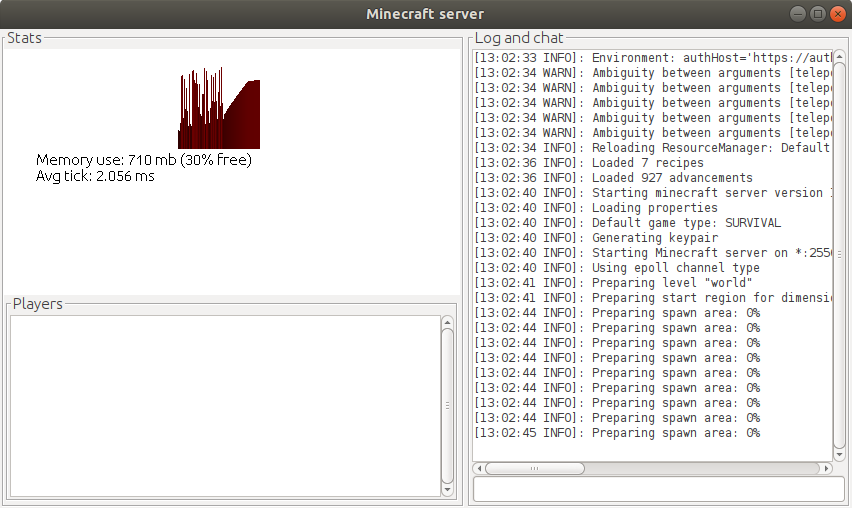
In case if you want to start the server with a user interface you can omit “nogui” argument from the command above. The user interface is not showing much, however, you can see memory usage status, players, logs, and chat.
That’s it! We have a functioning Minecraft server installed, now let’s go to the part where we are going to answer the question of “how to allow Minecraft through firewall?”.
By default, the Minecraft server is listening to 25565 port, however it can be verified or changed in the “server.properties” file (see the row “server-port=25565”). To allow our friends to join we should somehow expose this port to the internet to allow incoming TCP connections. We have many options to achieve this such as:
Each of these options has their pros and cons. Here you can find a detailed comparison of different methods for exposing a local server. In this article, we are going to use tunneling for exposing the Minecraft server to the internet, since Tunnel In is aimed to create and manage network tunnels. This method is secure and with our platform it is easy to use and elegant way for exposing any local network service to the internet.
First of all, you need to create a free account and set up an agent to your computer. Here is a link on how to install Tunnel In on Windows PC.
That is all you should do in your computer, the rest you should do from Tunnel In’s web portal i.e. it means after installing an agent all configuration can be done remotely.
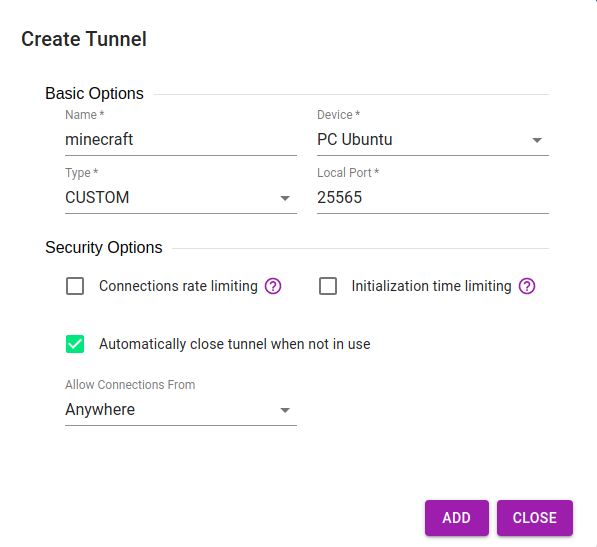
Now lets create a tunnel and expose local server to the internet. For that just go to the Tunnels tab and click on “+” button in the bottom right corner. Name the tunnel, select your device, select CUSTOM type for the tunnel, and enter the port number (by default it is 25565). Remove two checkboxes from Security Options (see picture below) and click on the “ADD” button.
The system will create and start the tunnel automatically. In the “Connection properties” column, you can see the URL pointing to your local Minecraft server. By clicking on the URL system will copy it to your clipboard. You can use this URL for connecting to your server from anywhere in the world. Send it to your friends and enjoy playing together!

Now when we know how to allow Minecraft through firewall lets speak a little about how to secure our server.
While you can use the Minecraft server with your friends it is time to speak about the security options of the tunnel. In the tunnel creation process, we saw the “Security Options” panel which provides a way to limit the connections to tunnel by IP address, time and connections count.
Here are a short descriptions of each option:
This is Tunnel In blog where we are writing about our service capabilities, how-tos, and about similar technologies.
We are using Tunnel In for managing tons of EDGE network servers. It is great to have such a tool and from one console to monitor and manage all our servers.
Relying on Tunnel In's enterprise solutions, we were able to develop our context-aware digital signage platform in a very short amount of time.
One Comment
Sanjiv Westbrook
This works very well, and it allows my MC server to be exposed, but for some reason, the tunnel closes after 2 hours or so if no one is connecting. I’m OK with this, but it doesn’t open when they try to ping the server or connect, which means I’m constantly having to go to tunnelin.com and reload the tunnel. Is there a way to fix this?